.svg@webp)
Simple and Quick Photogrammetry Reports in Pixpro Software
 Lukas Zmejevskis

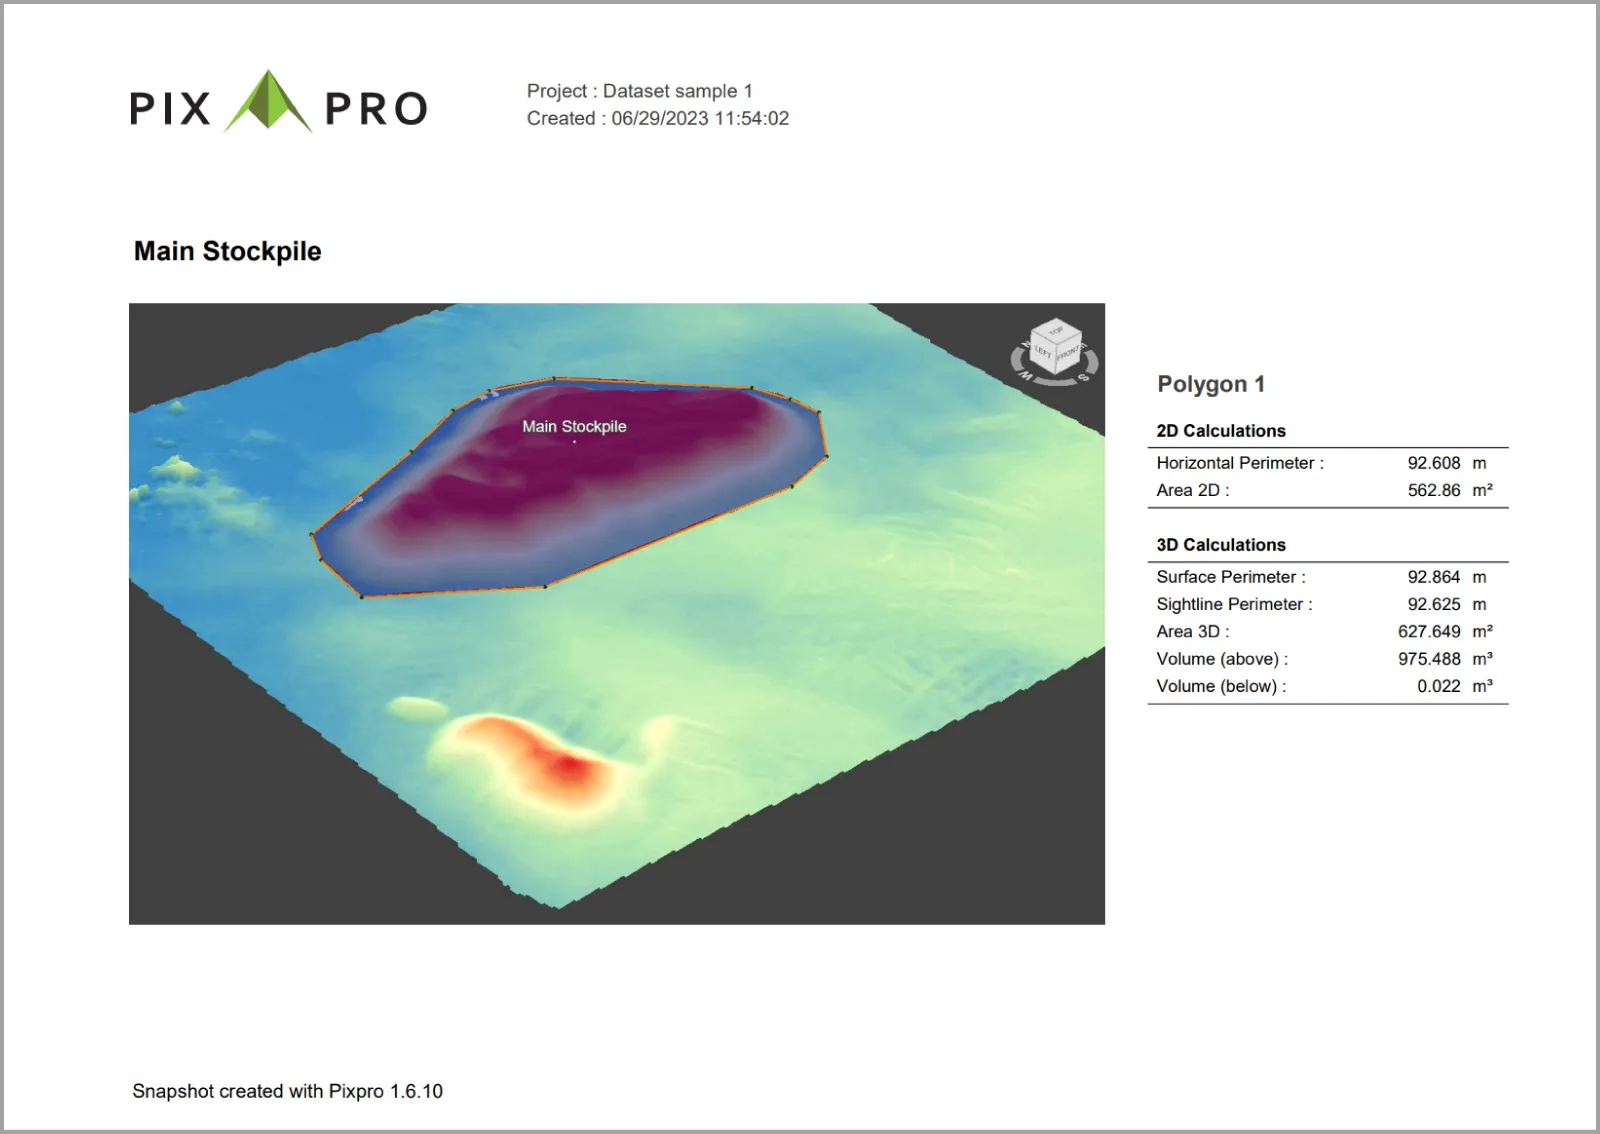
Pixpro photogrammetry software has a simple but handy feature called print to a snapshot. This feature lets you get your project data onto a simple, easily printable document - a basic report. In many cases, this is the desired result for many people. An easy way to share measurement findings is via email, printed documents for the field, or just showing it to someone without opening a project. This article will teach you how to use the print-to-snapshot feature and showcase a few examples.
Preparing The Project
Pixpro prints to snapshot works by taking a screenshot of the current 3D view and putting that into a PDF document. So everything you can see in the window at your current orientation and zoom - will be visible in the snapshot. However, if an object is selected, you can see the option to include its measurements. It applies to linear measurements - line objects and volume-area measurements - polygons.
Graphical Options
Every graphical option and layer that changes something in the 3D view is a tool to alter what you see in the snapshot. These options include:
- Turning on or off any layer in the layers panel. The layers panel contains your generated and drawn items in the project. From sparse point cloud to a drawn polygon - you can display any layer and produce a snapshot of it.
- Layer-specific graphical options - each layer has some different display characteristics to choose from. We will go into more detail in the next section.
- Global options - going to Tools > Options allows you to change settings that will alter key software aspects, such as units, which will reflect in snapshots. You can explore the graphics options tab to customize the 3D view background and default colors and sizes for drawn objects.
- The size and shape of your software window will influence the screenshot part of the PDF.
Other things such as open panels, toolbar, or other windows like options, photo manager, or anything third party do not reflect in the snapshot.
Layer Specific Graphics
Many layers in Pixpro have some customizable graphical properties. Every customization will reflect immediately in the 3D view without changing any actual data and, therefore, will be visible in the snapshot. When a layer is selected, these options appear in the properties panel on the right. Here is a summary of the available graphical options for each layer:
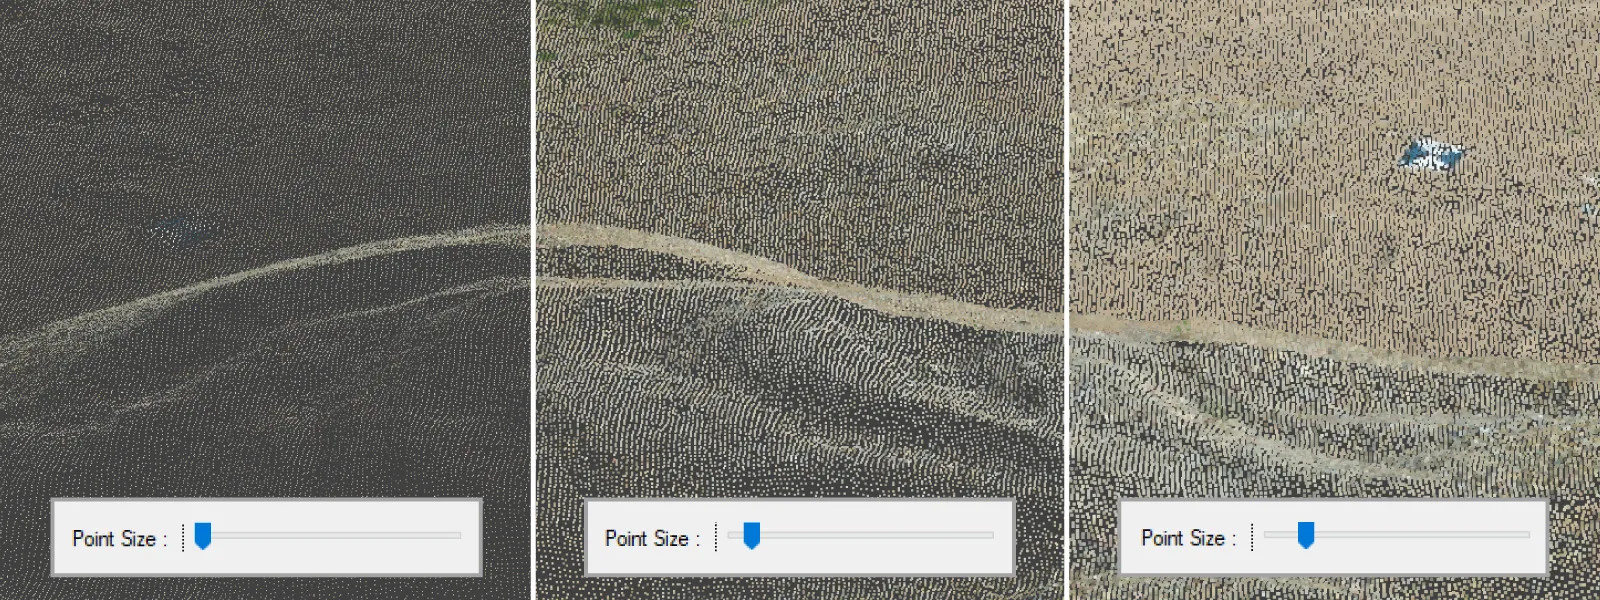
Point clouds: Point type and size are adjustable.
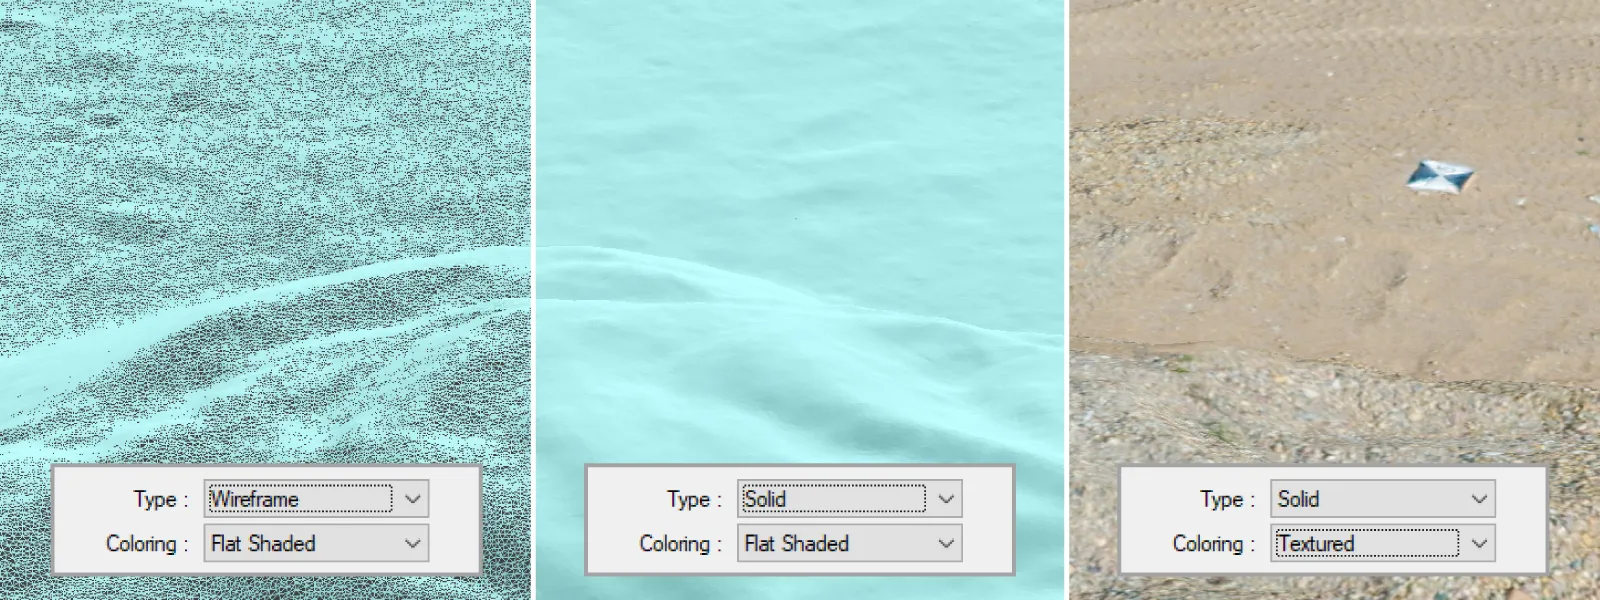
Meshes: You can change the type from solid to wireframe and coloring from flat to texture.
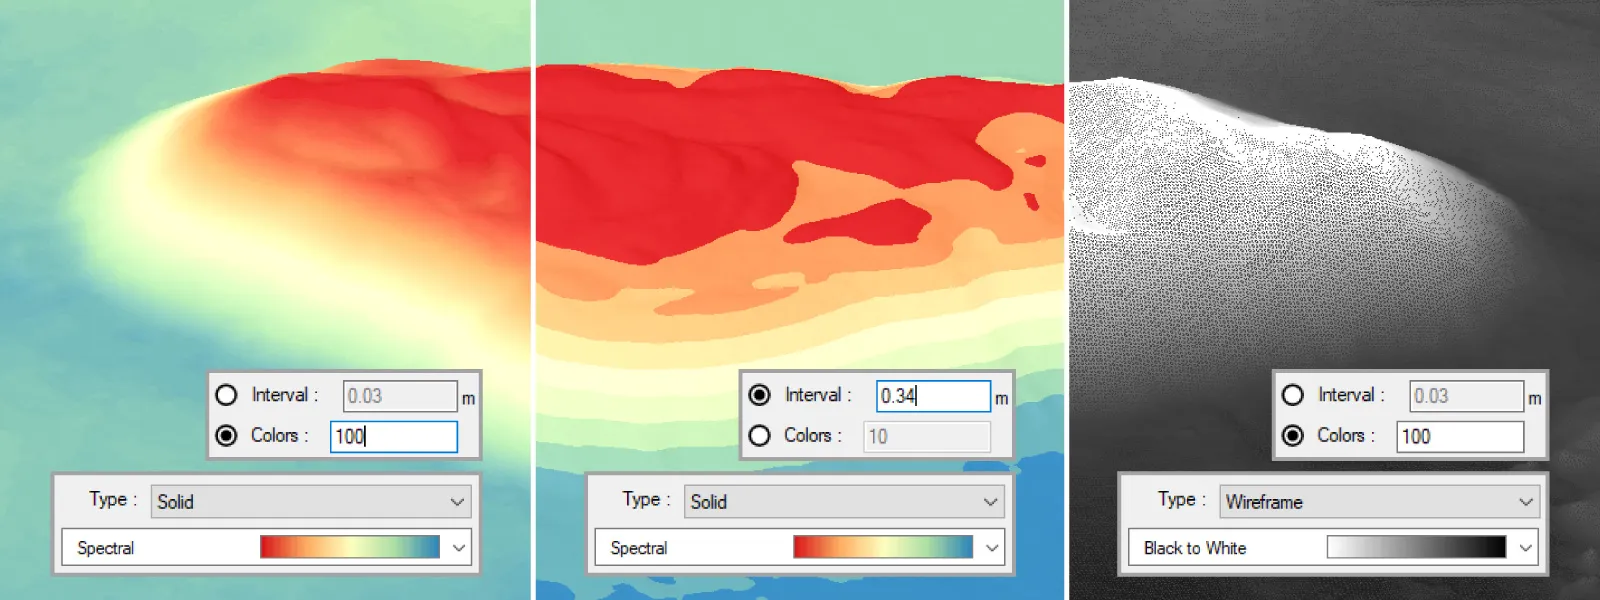
Digital Elevation Maps: Digital elevation maps have the most graphical options. Type from solid to wireframe. Coloring - flat, gradient, or orthophoto (if an orthophoto layer is available). The gradient coloring in itself has many color schemes and an adjustable histogram. You can also choose the height interval or the number of colors in a gradient.
Contour lines: You can change the color of the contour lines.
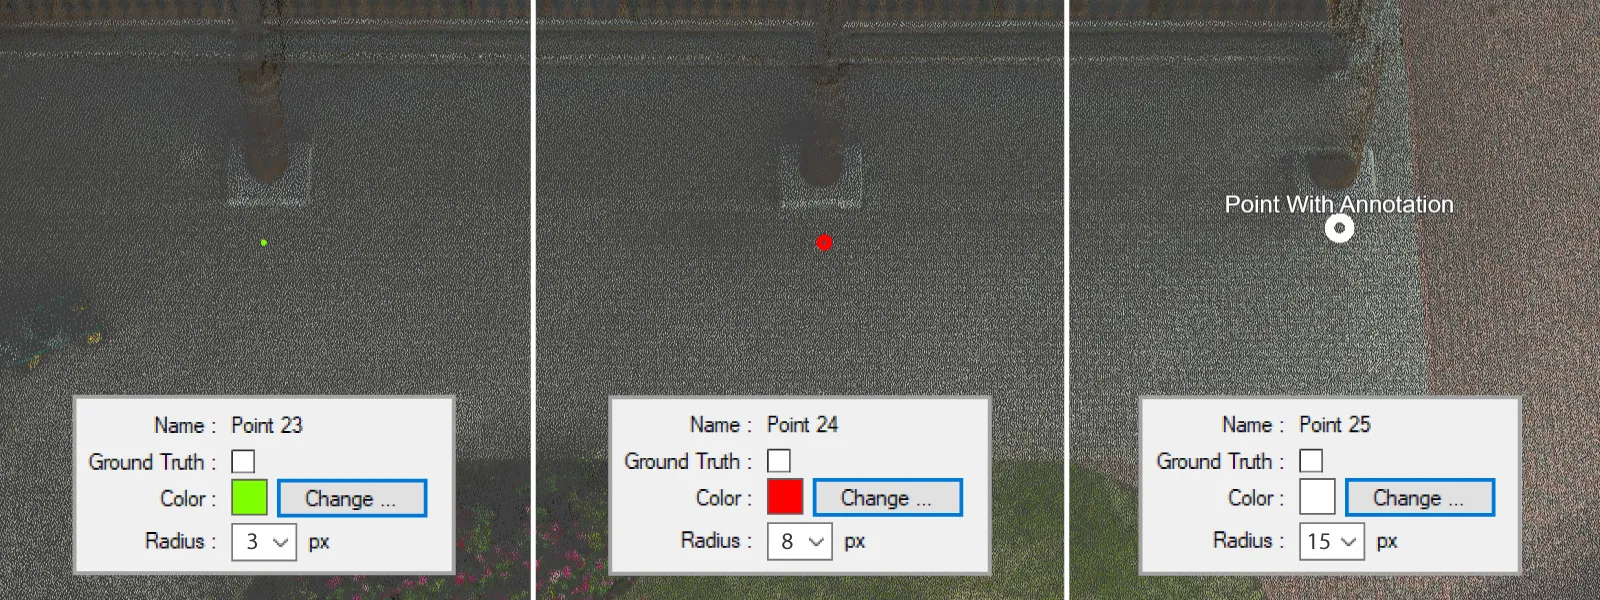
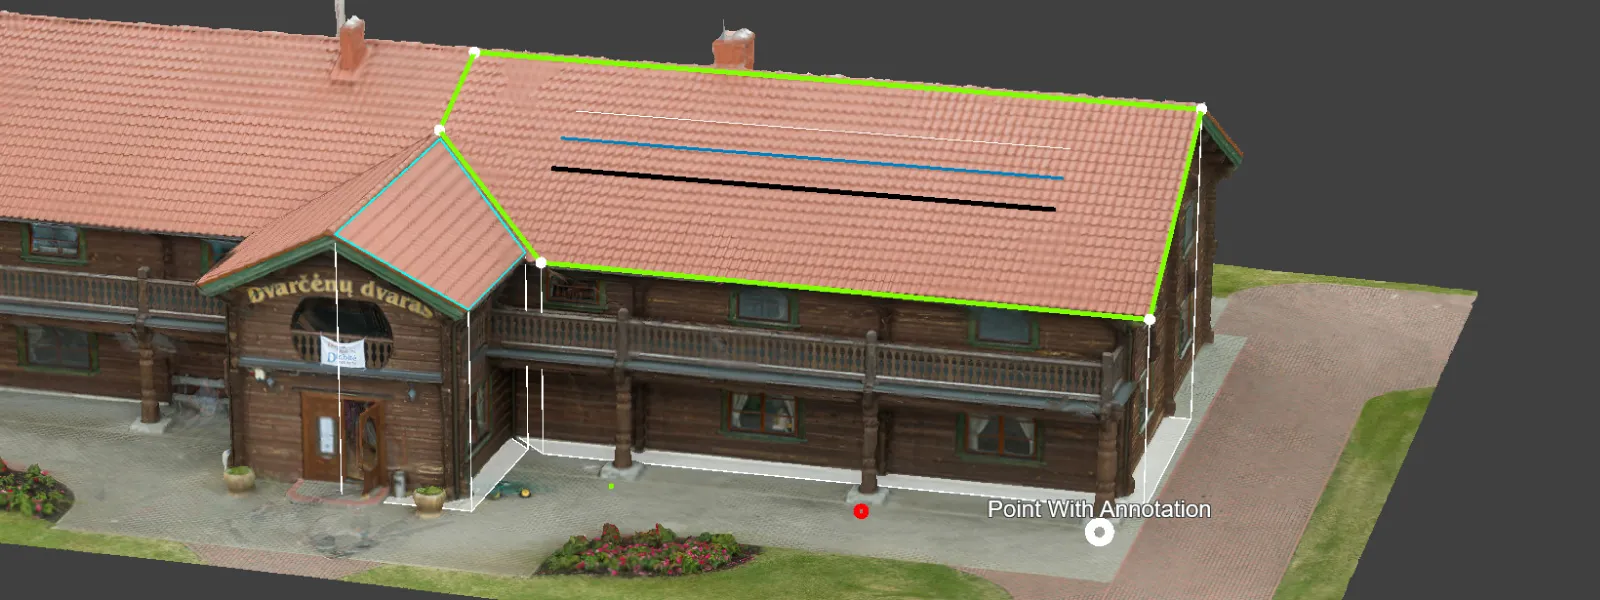
Points: Each point has a color and radius option. And crucially, points can have annotations. You can enter any text in the description field, adjust the font size, and the annotation will appear in the 3D view next to the point.
Lines: Each line vertice has the same options as a point, and the line has color and weight options.
Polygons: Same options are available as with lines. Remember - you can change the initial default values in the options for both objects. Polygons do have a global transparency setting too.
Short Tutorial
We created a short video on how to use the snapshot feature in Pixpro:
Conclusion
Now you know how to use the snapshot feature in Pixpro photogrammetry software, and it will come in handy at some point. Creating a basic PDF file or printing it directly on physical paper takes just a few seconds. A simple report with volumes or lengths of a critical area will provide everything you need for simple documentation or monitoring. You can try this feature now for free with our 14-day trial.
Photographer - Drone Pilot - Photogrammetrist. Years of experience in gathering data for photogrammetry projects, client support and consultations, software testing, and working with development and marketing teams. Feel free to contact me via Pixpro Discord or email (l.zmejevskis@pix-pro.com) if you have any questions about our blog.
Powiązane posty na blogu
Nasze powiązane posty
Wszystkie nasze narzędzia i technologie są zaprojektowane, modyfikowane i aktualizowane z myślą o twoich potrzebach
Znaczenie cieniowania w fotogrametrii 3D
Rekonstrukcja obiektów 3D ze zdjęć nie jest skomplikowana, zwłaszcza z pomocą oprogramowania opartego na fotogrametrii. Choć analiza obiektu 3D wydaje się prosta i wymaga tylko kilku kroków, nieprzewidziane przeszkody mogą pojawić się w każdej chwili.
Jak Przekształcić Zdjęcia w Spektakularne Modele 3D?
Wirtualna rzeczywistość (VR) to komputerowo generowany scenariusz, który symuluje realistyczne doświadczenie. Krok po kroku staje się integralną częścią codziennego życia ludzi. Teraz możemy wybierać meble, "chodząc" po mieszkaniu w trybie 3D, odwiedzać muzea lub nowe miejsca, zakładając jedynie par

Kiedy Interaktywny Histogram staje się Niezastąpioną Funkcją
Istnieją sytuacje, w których analiza obiektów przy użyciu oprogramowania opartego na fotogrametrii jest trudna do przeprowadzenia, szczególnie gdy obiekty są bardzo duże lub bardzo małe. Dzieje się tak, ponieważ obiekty często są trudne do zauważenia. Dlatego histogramy są jedną z najbardziej przyda
Gotowy, aby rozpocząć swój projekt?
Możesz wybrać spośród naszych trzech różnych planów lub poprosić o niestandardowe rozwiązanie, gdzie możesz przetwarzać tyle zdjęć, ile chcesz!
Bezpłatna 14-dniowa wersja próbna. Anuluj w dowolnym momencie.
Witaj w Pixpro
Zaloguj się
I uzyskać dostęp do swojego konta.