.svg@webp)
Surface Comparison Part 2
 Lukas
Zmejevskis
Lukas
Zmejevskis

You can compare surfaces with a high level of precision even without accurate RTK GPS data. In the first part of this article, we create artificial GCPs from a base project to use in another project for referencing. In the second part, we shall apply that technique and compare two surfaces in a real-world use case for stockpile volume measurement. We dug up an example we made in the past for this exact use case.
Recap and Step 1
In the previous article, Comparing Surfaces in Pixpro Part 1 - Creating Custom GCPs, we created what we call artificial GCPs, which are control points in general. We used a different example project to show how simple points with projections become control points for reference. Now, we are using nadir scans of a stockpile obtained a while ago with a DJI Phantom 4 Pro drone.
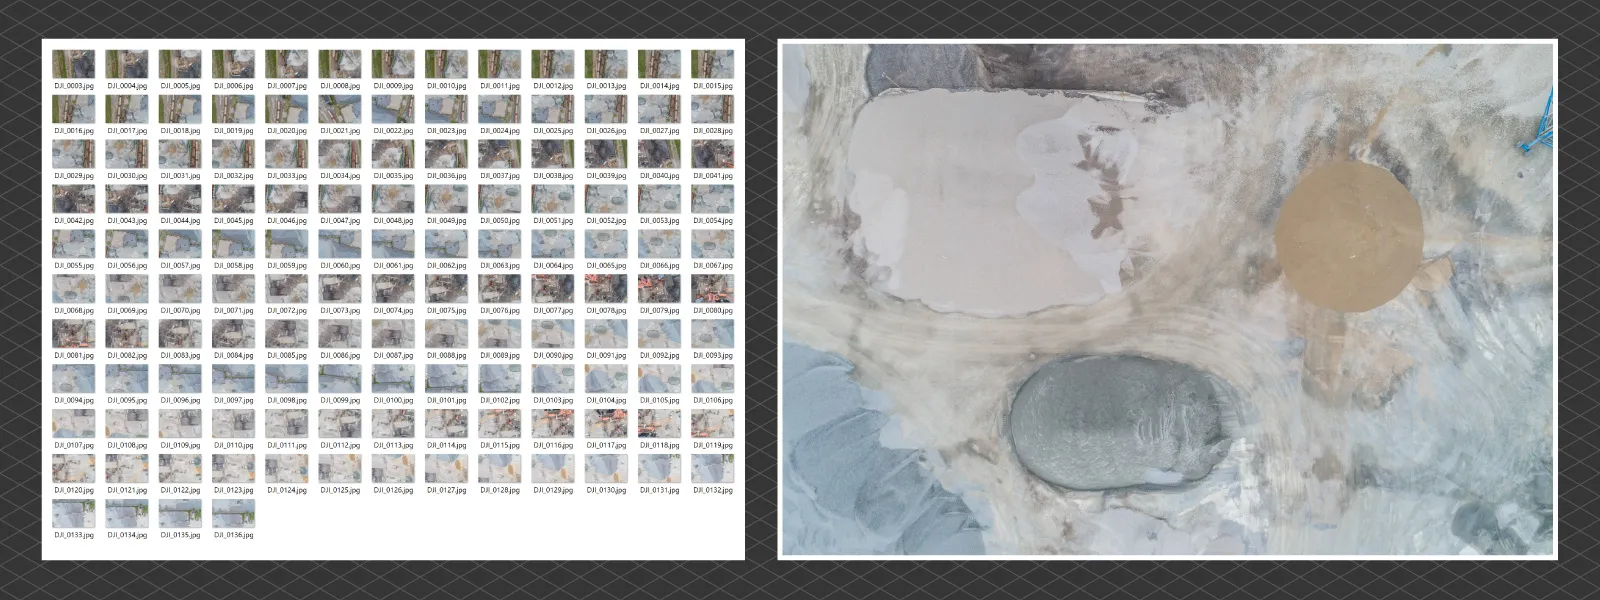 Now, we will do the same for our real-world use case. We have two scans of the same stockpile area, made a couple of days apart. The difference is a pile of material deposited in a previously empty area. With the scan of an empty lot, we can precisely compare the two to measure the volume of the material with utmost accuracy. Before we do the first step, we process the project containing the pile up to the dense point cloud stage.
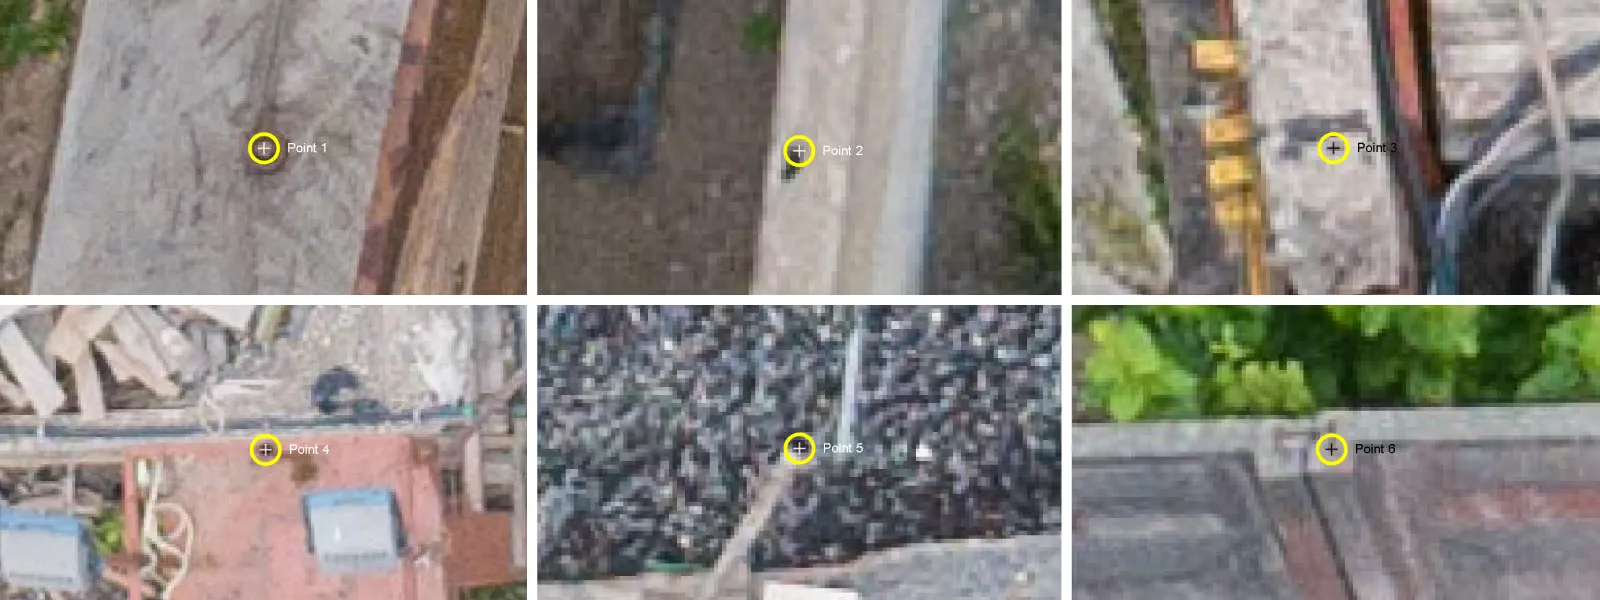
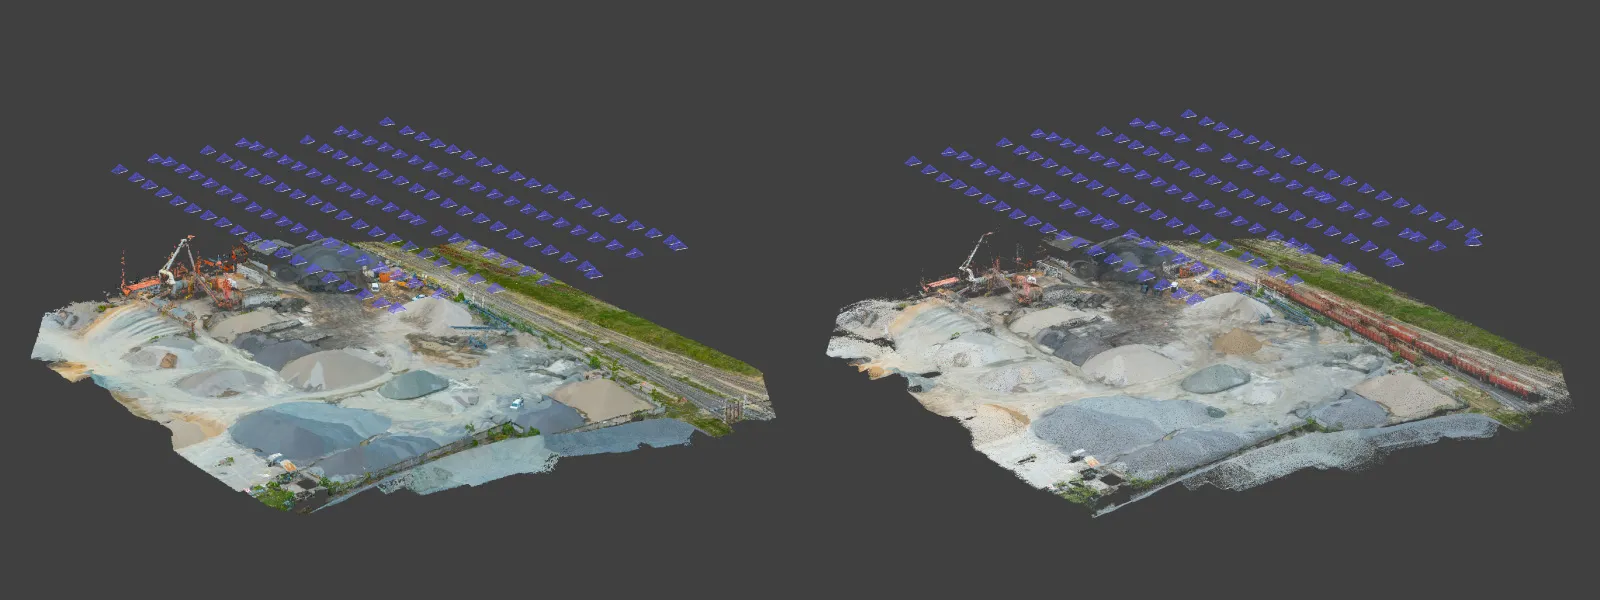 Step 1 is to find several spots in the scene that did not change during the time between scans, our stable control point locations, mark them, and export them as points. The previously mentioned article provides a detailed workflow and rationale. We are doing the same with this project, validating both photo sets for the same stable spots. The final result of this step is a control points file, which we will use to reference both projects.
Referencing and Validation
The next step to precise surface comparison is to make the referencing in both projects as identical as possible. This means using the same referencing data—the ground control points we obtained in the first step. To do that, we follow the standard GCP referencing procedure in Pixpro software.
First, we process both projects up to the 3D reconstruction step, which means only sparse clouds are present in the project. Of course, we have already done one of the projects, so we can choose to work on this one, resulting in the removal of dense point clouds. For the purposes of this article, we will create a new project. We have an article on inputting and projecting GCPs here, but you can also watch an uncut screen capture below.
Further Processing
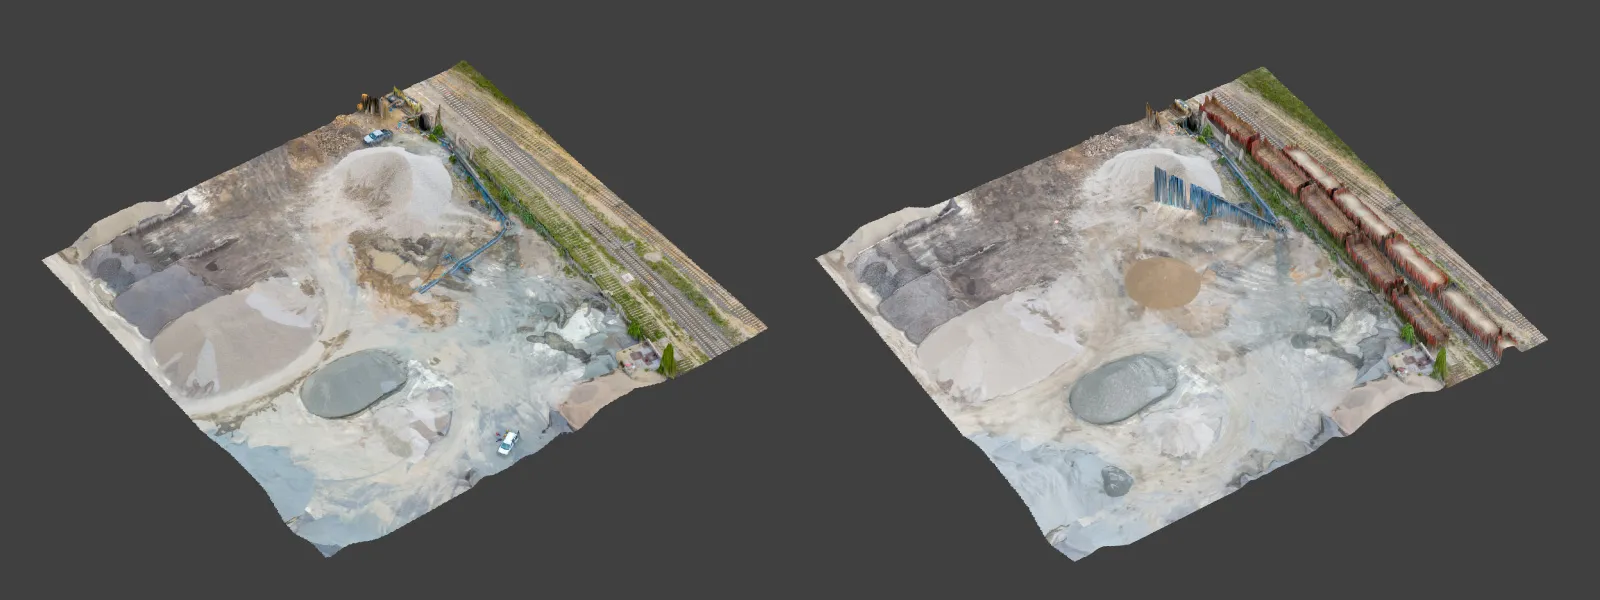
Once we have both projects with imported and projected GCPs, we reference the project using these GCPs and run a reoptimization step. After that, we can process whatever layers we need for the work we are going to do. Our purpose is to do volume measurements, so for both projects, we created dense point clouds, digital elevation maps, and orthophoto images with identical settings. Identical settings are necessary for the best comparison consistency.
After creating the dense point cloud, we may need to do some cleanup. In this case, we did a usual crop of the point cloud and cleaned off the material transporter crane hanging over our stockpile area. This helps to keep the digital elevation map clean in that area.
Export and Import
With the processing complete on both projects, we need to add data from one to another. Now, we export the DEM and orthophoto layers from the empty lot project and import these layers into the project that does have the pile of material in it. The export process is straightforward: just right-click on the necessary layers and export or import them into the open projects. A screen capture of this process is below.
Measuring Volume
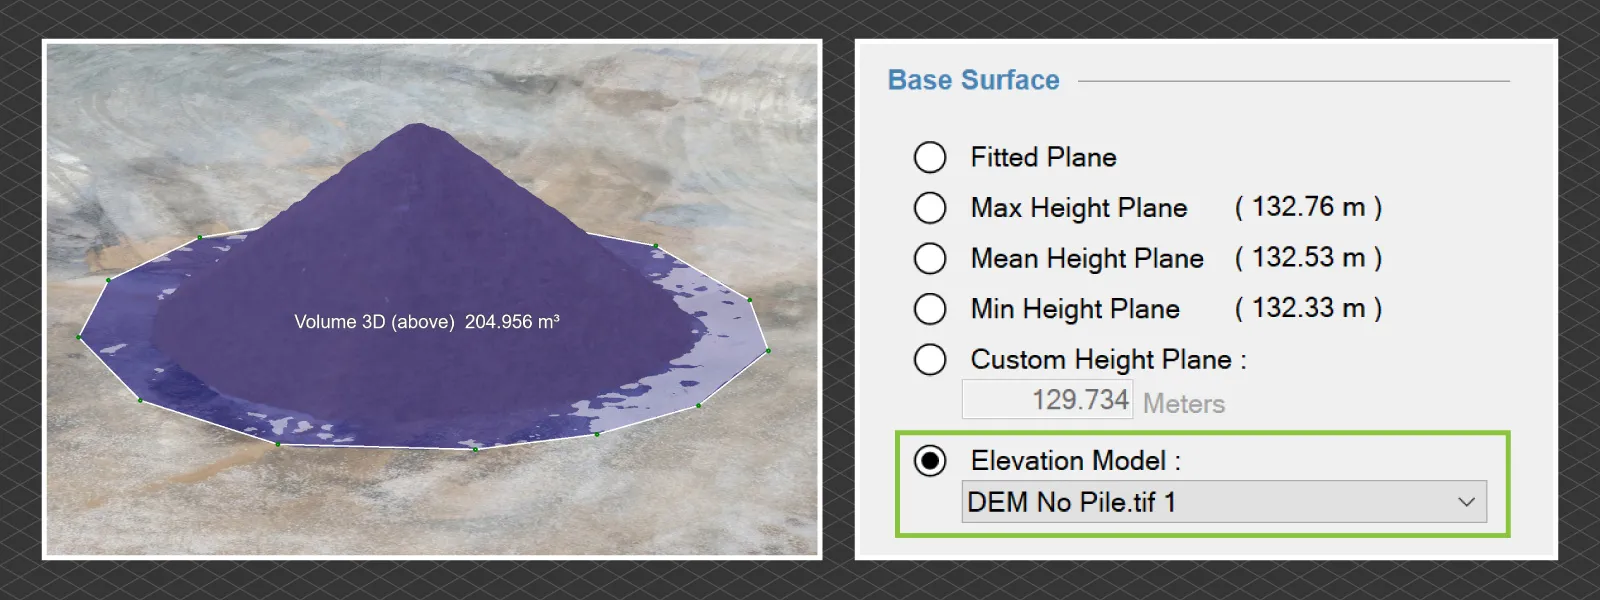
Now that the empty lot scan data is present in the project with the pile, we can use that as our base surface for measurements. Volume measurement in Pixpro is done by drawing a polygon around the pile and selecting the base surface. With two DEM surfaces present in the project, you will see the option to use a DEM as your baseplane. It will not be a plane but the surface we made for this exact purpose. Select that, and you will get a precise measurement after a few moments of processing.
Timeline
Having two or more DEM surfaces enables us to use the timeline feature. It is a way of showing data from multiple measurements in the same table. The timeline table will show how volume changed for each layer according to our polygon and base plane selection. For demonstration purposes, we created a couple more layers by duplicating the DEMs and editing them using Pixpros leveling tools. Below is a short screen capture video of how we used the timeline.
Conclusion
A bit of know-how and decent data are all you need to make a relative comparison between two layers for volume measurements. The empty lot scan can only be done once, and all of the changes monitored in the future can be used as a reference if the base of the lot is solid. Establishing stable, immovable spots in a stockpile complex is also helpful, as data can only be gathered once for visual control points like we did in this article or true GCPs. If we do that once, we will have a stable frame of reference for all subsequent projects.
Photographer - Drone Pilot - Photogrammetrist. Years of experience in gathering data for photogrammetry projects, client support and consultations, software testing, and working with development and marketing teams. Feel free to contact me via Pixpro Discord or email (l.zmejevskis@pix-pro.com) if you have any questions about our blog.
Related Blog Posts
Our Related Posts
All of our tools and technologies are designed, modified and updated keeping your needs in mind
Roof Scan for Inspection and Solar Panel Addition – Use Case
Roof photogrammetry is one of our client base's most common use cases. Obtaining accurate measurements is essential for designing a solar panel layout, determining how many panels fit on a roof, and conducting a prior inspection.

Resolution vs. Altitude: Do 50 Megapixels Actually Matter?
We all know that megapixels are not the only defining factor of image quality, and the megapixel race is long over. However, we need to know their uses when we have two resolution options.

Dealing with Snow and High Contrast - Aerial Construction Site Scan
Aerial photogrammetry is dependent on the weather conditions, and there is no other way around it. While we can not fly our drones during extreme weather - dealing with something like a little cold or snow is not that hard.
Ready to get started with your project?
You can choose from our three different plans or ask for a custom solution where you can process as many photos as you like!
Free 14-day trial. Cancel any time.