.svg@webp)
Pixpro Version 1.7.10 - New Feature - Inspections
 Lukas
Zmejevskis
Lukas
Zmejevskis

Another new Pixpro version is here, and it brings a singular new feature - an inspection module. Inspections are a large part of photogrammetric scanning because it is the most convenient and long-lasting way of visual remote sensing. Having your 3D scene, which has no practical scale constraints, and being able to look at it from many angles can make or break entire workflows in construction, restoration, preservation, conservation, and many other areas.
Inspection Requirements
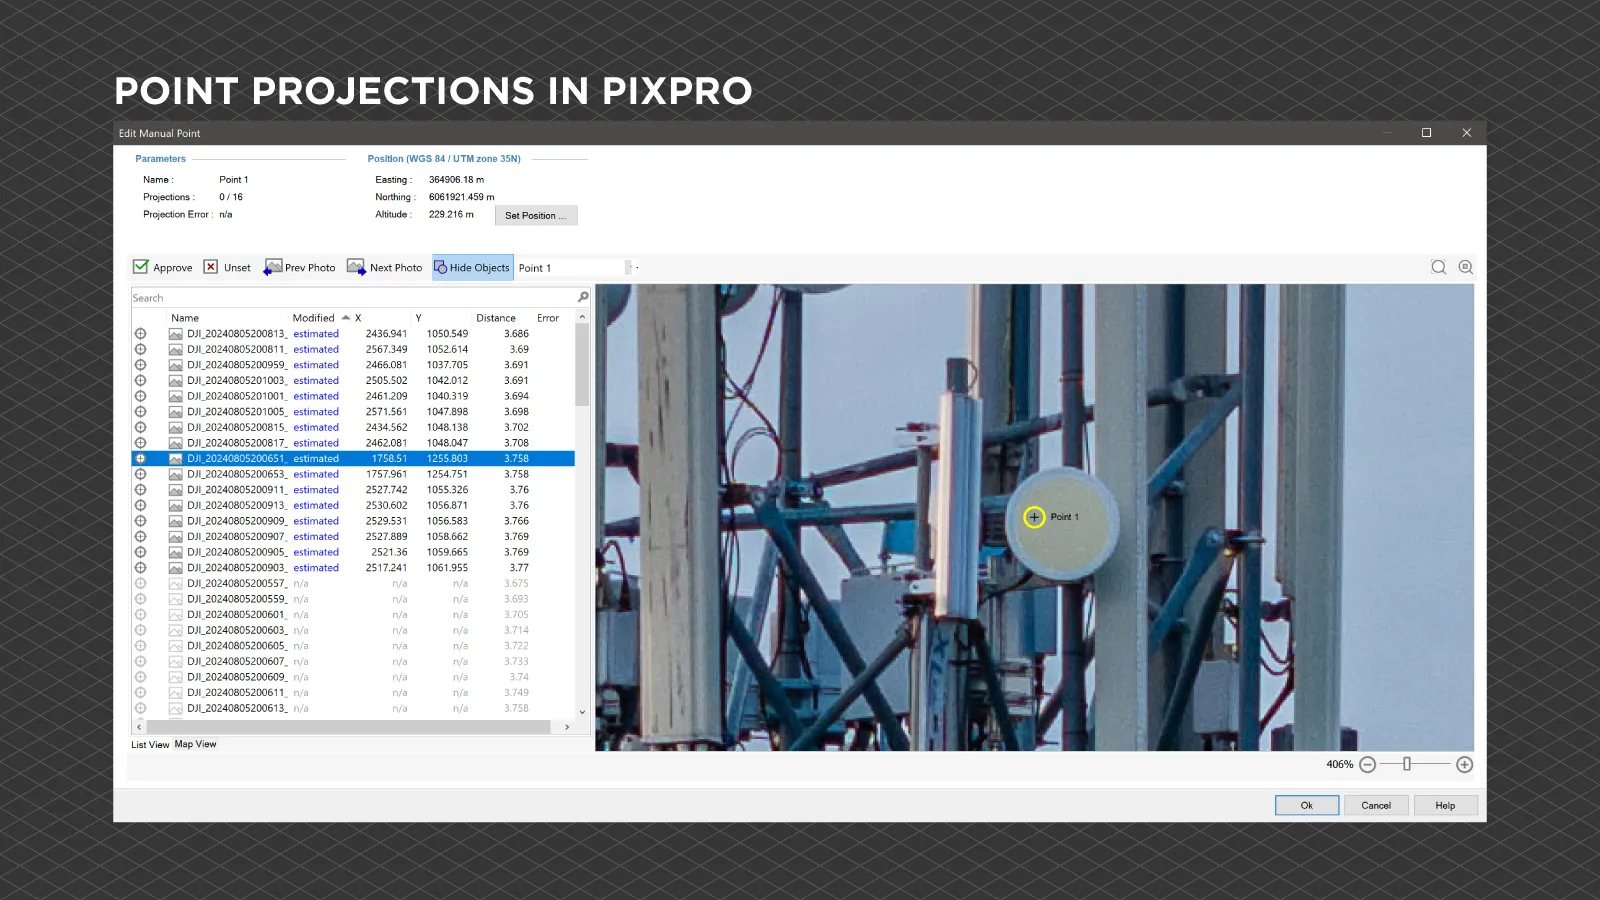
We used point projections in Pixpro to do inspections, which was not technically a dedicated module. Projections are placed in photos that a 3D point from the scanned scene projects at. So, each 3D point in the scene has at least a coordinate equivalent in at least a few photos. This is what enables us to have a 3D scene in the first place.
 The module is based on projections but has a few quality-of-life improvements and additional features. We now have a new layer group called inspections, and we can add an inspection point by clicking the inspection button in the toolbar or right-clicking on the layer group.
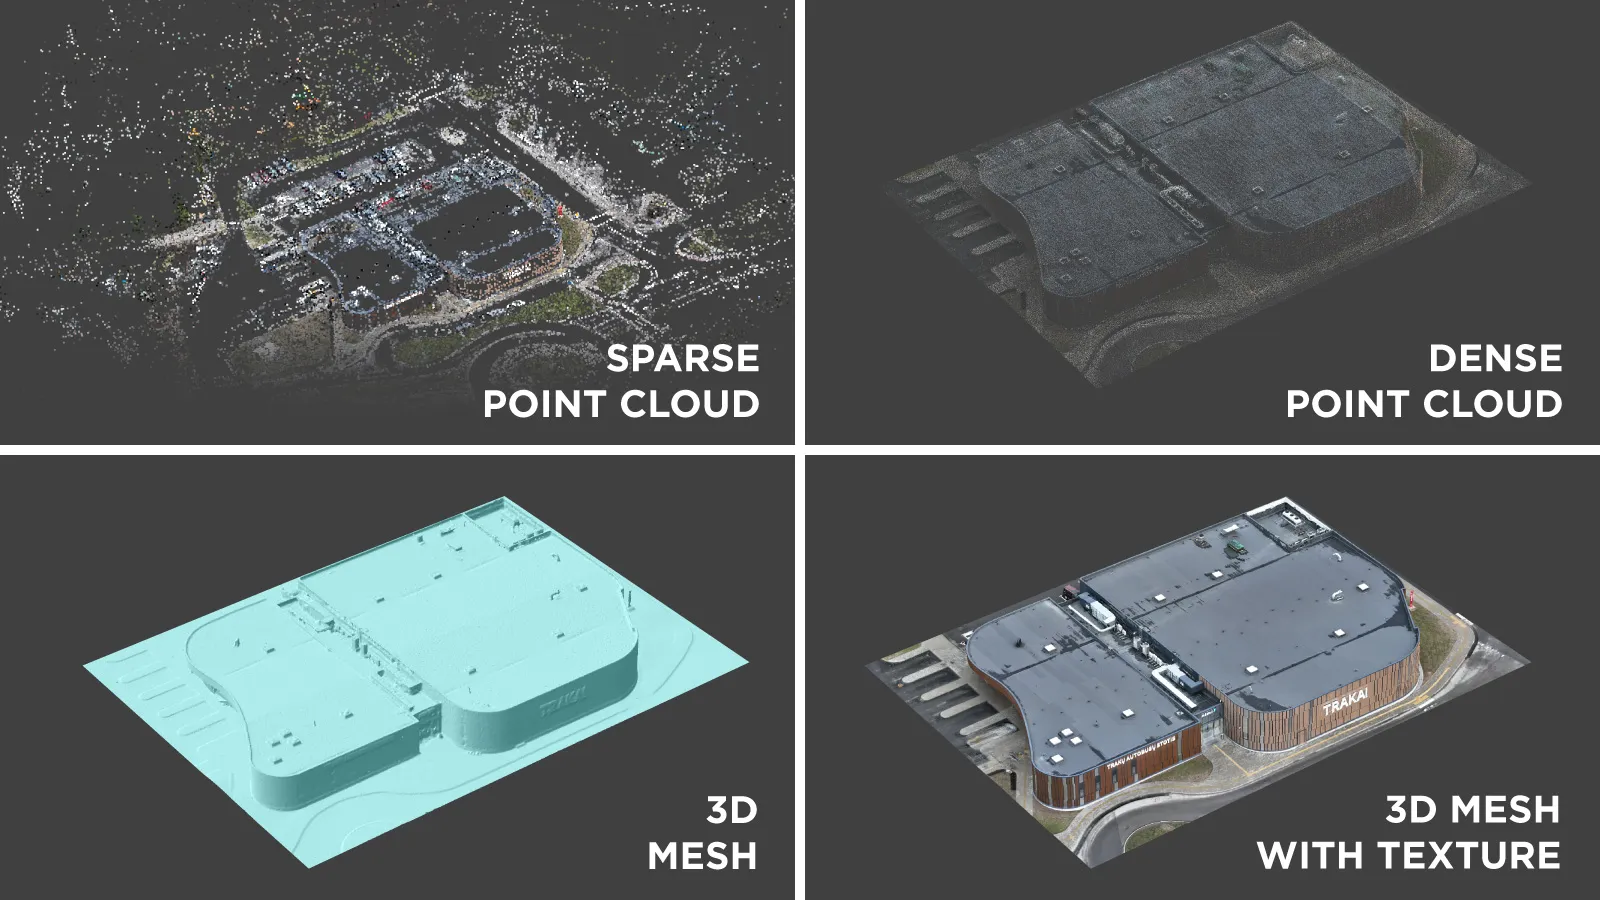
Before we do any inspection, we need to have a 3D model ready. Processing for inspection is no different than for any other purpose. However, while inspection points will work on any layer, it is recommended that a 3D mesh with texture be used. For that process, the 3D reconstruction, dense point cloud, crop that point cloud, and then the mesh with texture.
 Inspection Module Interface
Once you place an inspection point, an additional interface on the right will load, showing you all of the photos in which the point is visible. If you are doing this on a 3D mesh, photos that do not have a direct line of sight to the point will be excluded (with a certain degree of tolerance).
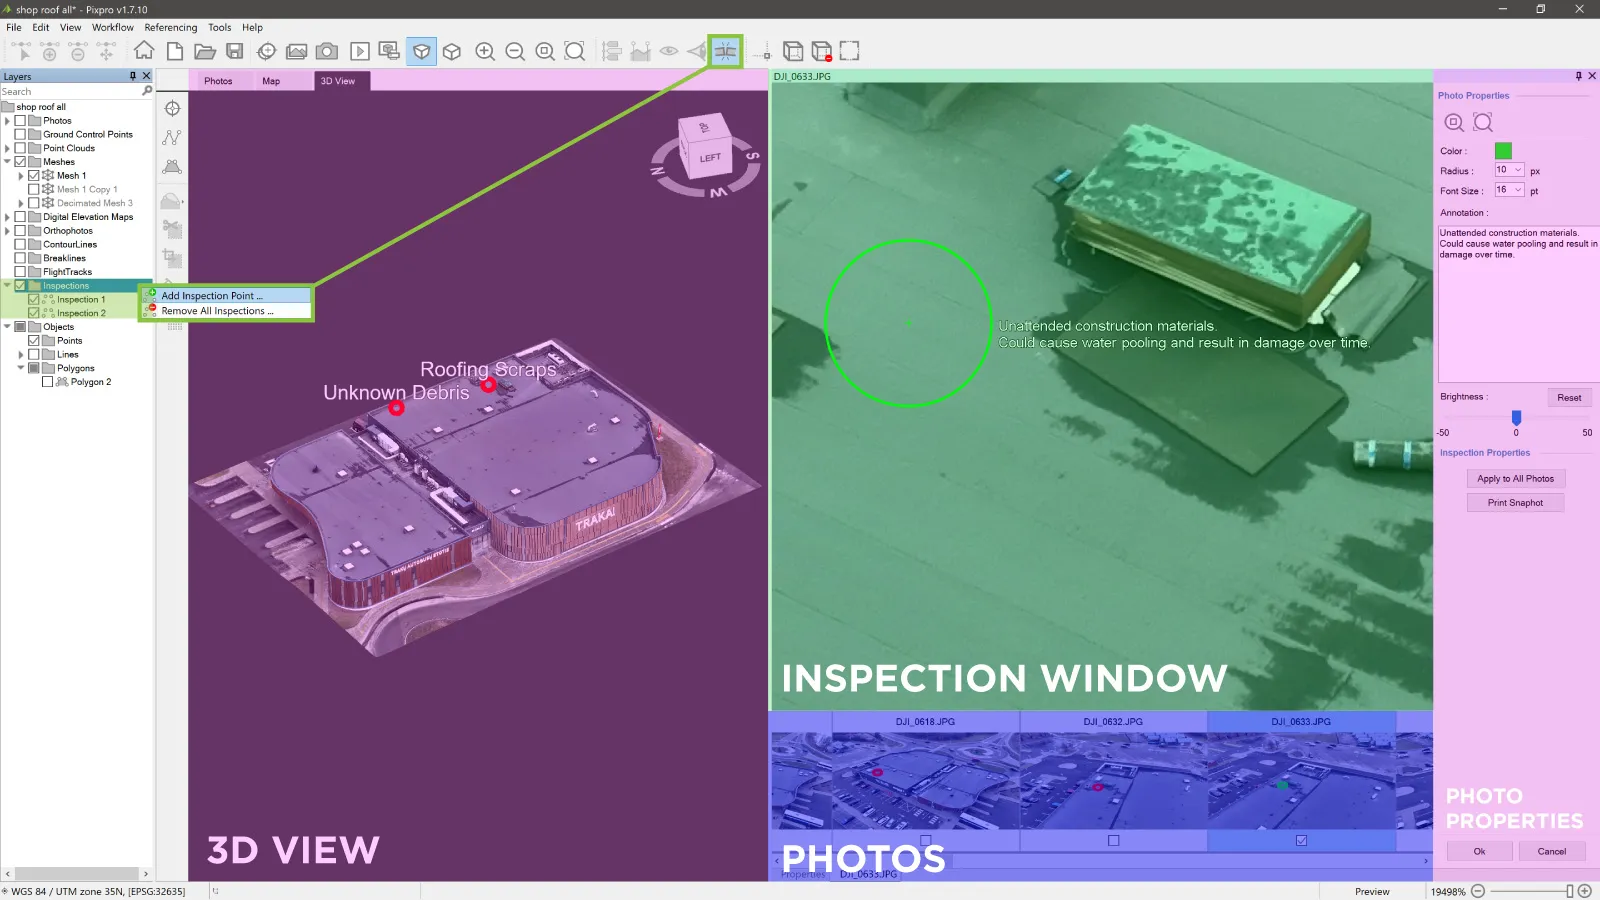 We have a strip of photos at the bottom and the main photo window. Currently, selected images will appear in the main window, while additional features and options are on the right. Let us go through these from top to bottom:
-
Scope button: centers and zooms into the inspection point on the currently selected photo in the main photo window.
-
Zoom Out button: zooms back to show the entire main photo.
-
Color: Changes the color of the inspection points as displayed in the main photo.
-
Radius: adjusts the outer circle diameter of the inspection point as displayed on the main photo.
-
Font Size: adjusts the size of the annotation text.
-
Annotation: Write it here in the annotation text field so it shows up on the photo near the inspection points and in the snapshots.
-
Brightness slider and a Reset button. Adjust the brightness of the photo in case something is not entirely visible. The reset button resets the brightness back to zero.
-
Apply to All Photos: Used to apply the settings above to all photos.
-
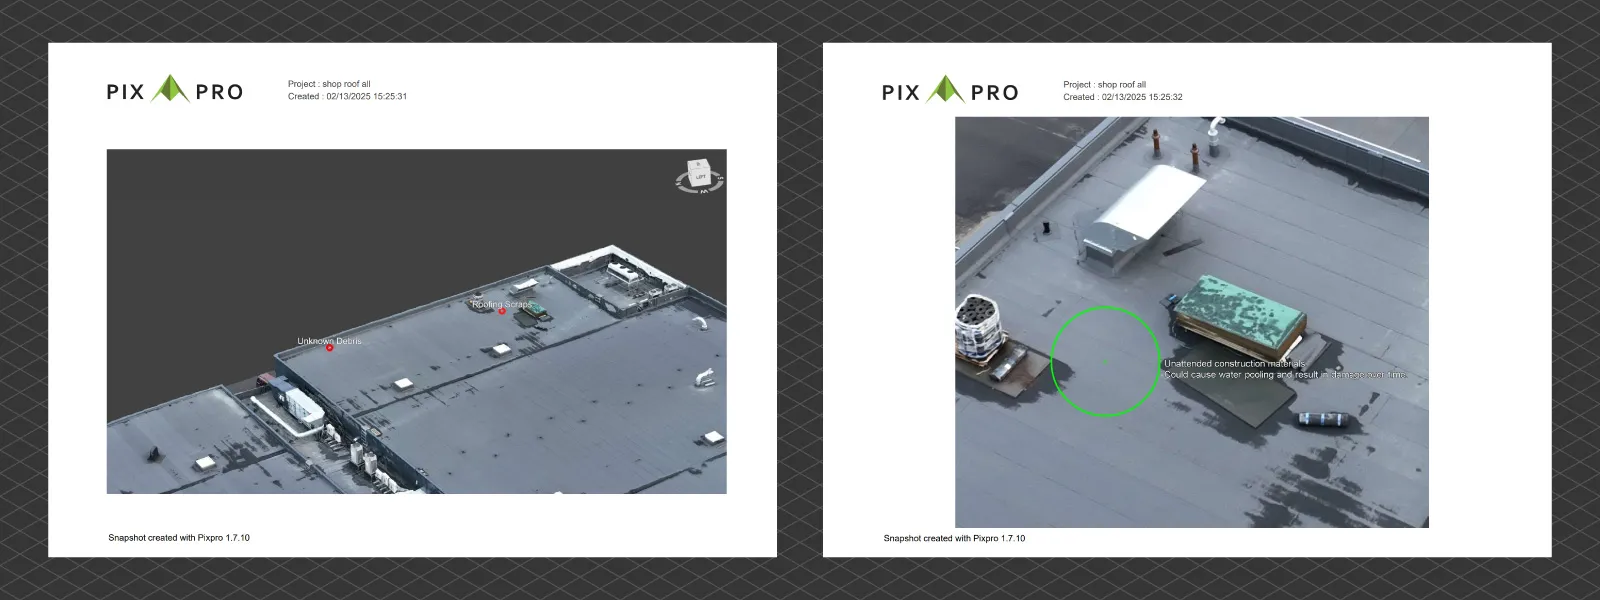
Print Snapshot: prints a snapshot of the inspection window, including the annotation. This will give you a similar result to regular Pixpro snapshots. For the inspection photo to be included, it must be selected in the film strip with the checkmark.
-
OK and Cancel buttons: The OK button closes the interface and saves the changes made, and the cancel button closes but discards the changes.
Inspection Photogrammetry Tips
Photogrammetric scanning for inspection has the exact fundamental requirements of good coverage, high image quality, and proper overlap. But there are a few more advanced tips you may consider when doing such a scan:
-
Use manual exposure or exposure compensation. If you are scanning a dark object on a bright day, auto exposure will try to balance that and make your subject darker. To a degree, this is not an issue as long as there is still data for the reconstruction algorithm, but a consistently exposed main subject is just easier to analyze visually, and we do not care about the sky or background being too bright.
-
Shoot RAW. This has the same logic as above, but you have more flexibility. If you shoot auto exposure and the main subject happens to be a bit too dark, RAW data allows brightening (or darkening if the reverse is true) the subject much more effectively than using 8-bit jpegs.
-
Add additional photos in points of interest. Suppose you need to focus on a particular area or spot on the subject. In that case, you can add more images in these spots to ensure every angle is available for inspection. However, there are a couple of pitfalls here: first, adding photos without moving does not count and is even detrimental. Second - drastically different photos relative to the entire image set will not make it into the reconstruction. Keep these aspects in mind.
-
Use multiple cameras. Using different focal-length cameras in the same project can provide more detail. The most common example would be using the 1x wide-angle module alongside a 3x module, available on many DJI drones. Keep in mind that digital zoom does not count, that is just cropping in and will not provide any real detail increase. We are talking either about different camera modules with different optics or more rarely (on drones) actual optical zoom.
-
Read up on previous blogs which are relevant when talking inspection:
Easy Roof Inspection with Pixpro
Commercial roof Scan and Inspection
Pixpro Waypoints - Orbitals with 3x Camera
Ground Sampling Distance Visualized
Conclusion
Another improvement to our software, with some small innovations, just makes the whole inspection workflow a bit better. We can still use the old way of checking point projections, which support lines and polygons if preferred. But points with annotations are usually the bread and butter for many. Combine that with quick snapshots, and you have an easily adaptable solution for many use cases. Try out the new module with a free Pixpro trial anytime.
Photographer - Drone Pilot - Photogrammetrist. Years of experience in gathering data for photogrammetry projects, client support and consultations, software testing, and working with development and marketing teams. Feel free to contact me via Pixpro Discord or email (l.zmejevskis@pix-pro.com) if you have any questions about our blog.
Related Blog Posts
Our Related Posts
All of our tools and technologies are designed, modified and updated keeping your needs in mind
Pixpro 1.7.11 - Seamless Model Sharing
We are keeping the development cycle relatively short these days, so here is a new update to our photogrammetry software. Update 1.7.11 brings improvements related to our cloud service.

Most Asked Photogrammetry Questions Part 4 - Pixpro Support Picks
I help my team support Pixpro photogrammetry software users on a daily basis and often get forwarded more technical or specific questions. This gives me a good idea of what people ask the most, so I am writing these blog posts to get ahead of many questions.

Pixpro version 1.7.9 and our 2025 Goals and Expectations
In this blog post, we have a small update to our Pixpro photogrammetry software and a bit of speculation and planning for the upcoming orbit around our G-type main sequence star.
Ready to get started with your project?
You can choose from our three different plans or ask for a custom solution where you can process as many photos as you like!
Free 14-day trial. Cancel any time.